Tuesday 27 December 2016

Merry Christmas

Hi Everyone

Hope you are all enjoying your holiday break.  I haven't been on lately as I had 2 weeks at a new job, a step daughters 21st then off on holidays which is where I am now.  Visiting my Mum and Dad who live at Zilzie, Queensland.  I grew up in this area but my husband didn't so I have been showing him around a little bit this visit, after we worked on my house I have near this area that we are trying to sell.
This is my husband pulling the kitchen apart so we can paint the cupboard doors, as you can see they are quite pink!

Now they are a lovely white thanks to my handy man husband.

 The white paint just brightened up the kitchen and hopefully will appeal more to a buyer :)

This is my lovely husband.  The top photo is in Emu Park at the Singing Ship and the bottom photo is at Rosslyn Bay.


Well I am being called to help out with our meal so I will sign off but before I do I would like to wish everyone a Merry Christmas and a Happy New Year!

'Til we craft again,

Donna


Sunday 4 December 2016

Reindeer Noses

Ok as promised here is what I've been working on...


I put the card stock in the printer, worked out my design In Word and printed.
Simple as that!
I also looked up Malteser's and Jaffa's on-line and put the ingredients list on the back of the packet.

Hope you like them, I think they are pretty cute.

'Til we craft again!

Donna

Twist and Pop Card

Hi Everyone!

Hope you have all had or still having a great weekend.  I start my new job tomorrow so a bit nervous and about to join the commuters on the train.

On a much better note I was asked to make a 21st card so I decided to make a twist and pop card.  Was easier than I first thought it would be and I would love to share what I made with you.

I will be showing how to make this card at my next Crafty Get Together.


i have yet to give this to the lady I made it for but I think she will really like it.

He likes the Holden HSV's and Ferrari's and into photography. I think I covered all areas.  Also the white part that has "Happy Birthday to you" stamped on it has all different old cameras lightly printed in the background.

I've also been busy making little Christmas things for my stall next Saturday.

I will post some photo's of what I made.

'Til we craft again,

Donna 


Sunday 27 November 2016

Heat embossing

I've been playing with some heat embossing today as I was asked to make an engagement card.


The first card I used the bronze embossing powder using versamark ink and the second card was with black embossing powder. Both the writing and the word Congratulations has been heat embossed.

Tip for today.....

When heat embossing, it is better to remove all static cling or anything else that may cause the embossing powder to stick on the card where you don’t want it to.
To prevent this before you stamp with your embossing ink, rub the powder bag over the entire surface of the paper. Then stamp your image with versamark or whatever embossing ink you are using then pour the embossing powder over the image. The powder should only stick to the stamped areas, and fall off the rest of your card stock with ease.
If you don’t have a powder tool, apparently a simple dryer sheet will work!
Note: I use Embossing Buddy from Stampin Up! Which you can purchase through my online shop.

Let me know how you go with your heat embossing, or if you have a question just ask me and I will endeavor to answer them :)

'Til we craft again!

Donna

Wednesday 23 November 2016


Hi Everyone!

I thought with the big savings this week a Hostess code would be the way to go!  The workshop order number for this month is FCVMA7U2. When the workshop earns Stampin’ Rewards which is a total order of over $250, I will randomly choose a customer who placed an order to receive the Stampin' Rewards. That customer can use them to buy any catalogue product or you can use them for our exclusive hostess-only items—see p. 198–201 of the catalogue.

Want more? You can also apply your Stampin’ Rewards towards becoming a demonstrator! See p. 196 of the catalogue for more about joining Stampin’ Up!


Just click on the Shop Now button at the top.


Monday 21 November 2016

Online Extravaganza


Hi Everyone
OMG what a great deal!!  I'm certainly going to take advantage of this offer!!  I hope you find something you might like as well, maybe something you've been eyeing off that was a bit more expensive, this will certainly help you afford that item!

Online Extravaganza only happens once a year so be sure to make the most of it!
For one week only, 21-28 November, you can save up to 40% on select products. To sweeten the deals, we will be having 24-hour sales on the first and last day of the promotion, featuring special products available for that day only. You won’t want to miss out on this great opportunity to stock up and save!

'Til we craft again!

Donna

Thursday 10 November 2016

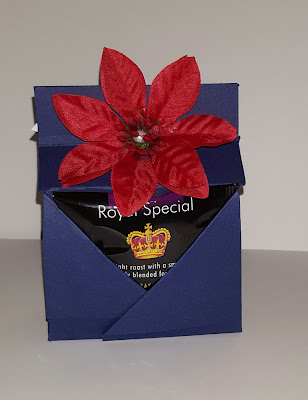
Tea / Coffee & biscuit gift pack

I had fun making this little gift pack, I'm cooking some shortbread biscuits now to put into the middle and sell them at my market stall on Saturday.
I hope people like them :)


I have changed the measurements to suit an A4 piece of cardstock which I will post later. :)

'Til we craft again!

Donna

Wednesday 9 November 2016

Market Stall

Hi everyone

I've been very busy lately trying to get ready for the markets plus an order for 50 of the little reindeer holders.

A holder for maybe a candle or those little bread sticks at Christmas time


The candy cane holders, I got the idea from pinterest...who doesn't love pinterest!


Crossing my fingers I do well at the markets :)

'Til we craft again!


Donna

Wednesday 2 November 2016

Crafty get together!


I am holding Crafty Get Together days...
Click on the photo above to take you to all the details.

Crafty get together!
RESERVE YOUR SPOT!
Come and join in a get together to sit and chat, share ideas and work on our projects! So what are you waiting for? Contact Donna today! 
Come join my Workshop, limited places available cost $8 bring your own supplies or whatever you are working on, tea and coffee supplied, my Stampin' Up products available to use. Available dates - Monday 7th November, Sunday 13th November, Saturday 26th November @ 10.30am. 
For more information please ask me. 
Please contact me on 0439707110 or email me on bumblebuzzcraft@gmail.com if you would like to secure a place. 
I will send you the details of exactly where in Narara when you contact me. Remember limited places available get in now!

Tuesday 1 November 2016

Stitched from the Heart & 25% Off coordinating stamp set


Not only are stitches a classic trend, they illustrate the quality, precision, and extra care taken when creating a piece. Giving a stitched gift shows just how much you value that relationship. Now you have the opportunity to purchase Stitched Shapes Framelits ahead of their official release in the 2017-2018 annual catalogue and get 25% off coordinating stamp sets. With Stitched Shapes Framelits you can make paper stitches in seconds, turning any project into one that is stitched from the heart.  The stamp sets bring out the beauty of the Stitched Shapes Framelits – and they are all 25% off! And there’s more great news…although the 25% off stamps sets ends 30 November, you will still be able to get the Stitched Shapes Framelits after that date!

Below is a little clip on how special these cards can be to someone.


Join trainer, Brandi Barnard, in the below video, as she showcases Stampin' Up!'s Stitched Shapes Framelits--available 1 Nov 2016 on stampinup.com or by contacting me or the shop now button if you would like to order these.


These look great don't they?! I like the 25% off the coordinating stamp set too!!
If you would like to order any please click on my shop now button or you can contact me if you need any help.

'Til we craft again!
Donna

Saturday 29 October 2016

18th male easel card

Happy Weekend everyone!

I've had a bit of a crafty morning this morning as we've been invited to an 18th and I just love the easel card so I made another one for this 18th.


It's for a male so I hope he likes it :)

What has everyone else been up to lately??

Oops just heard my husband drive up the drive, better go and finish getting ready hehehe

'Til we craft again!

Donna

Thursday 13 October 2016

Baby Shower invite

My daughter is having a baby shower soon and I've been given the job of making the invites.  So I thought I would share what I've come up with....


The size of the card is 10.5 x 10 cms, so I get 3 out of one piece of card stock.
So now I've got about 25 more to do :)

Til we craft again!

Donna

Wednesday 12 October 2016

Lamp

Hi!  I know it's a little bit away from Stampin' Up! (though I did use a retired die for the flowers :) ). I made this lamp from a Chicken tonight/Dolmio's etc jar.  I thought it was just too cute not to share :)


Hope all is well with you!

'Til we craft again!

Donna
Wednesday 5 October 2016

Buy 3 get one free


What an awesome deal!!!

If you want in on this awesome deal please contact me or click on any of the pictures to take you straight to my shop where you can order these and have it delivered straight to your door!  How good is that?
With Christmas just around the corner this is the perfect way to buy the Christmas Designer Series Paper for those Christmas cards or projects you are wanting to make.
You could even cut them to size to use in your project life albums!

Only on until the end of October so get in before you miss out!

'Til we craft again!

Donna


Saturday 1 October 2016

Hi everyone!! Well I am at a Crafting retreat and having a great time. Though I miss my wonderful friend who couldn't stay for the whole 4 days :-(
Wish you were still here Tanya!
Oh and what a weekend to have it on...as today is World card making day!!  Were you able to make any cards today?

Here is a photo of my work station...

I've been working on some note card sets and a couple of cards to which I will post photos later when I have more mobile phone service and wifi.

If you are lucky enough to have a long weekend this weekend I hope you enjoy it to the fullest!

'Til we craft again!

Donna


Friday 23 September 2016

Thinking of you card

I've been busy with a bit of Country Women's Association (CWA) stuff lately.  But have made this card for one of our branch members who had a fall the other day and isn't feeling quite right.


I cased it from pinterest with a few of my own changes to it.  I'm quite liking the Silver metallic thread, just puts that little bit of interest on the card without being overbearing I think.  For $5.25 for 45.7m it is pretty good value!

Anyway I better go and put the wine on to chill as I am going out for tea/dinner (whichever you call it) for a girls night out and the restaurant is BYO...and chinese YUMM.

'Til we craft again
Have a great weekend!

Donna

Saturday 17 September 2016

Note Card Envelope Holder

I got a chance to craft this morning.  I've been wanting to make something to hold a set of note cards to sell at the markets.

I found a way to do this when searching through all the great ideas on pinterest.


I made this using the Stampin' Up! Envelope Punch with a piece of 8 1/4 x 8 1/4 inch card stock.  Then decorate as you like.

I will see if I can put a tutorial up soon.

Til we craft again!

Donna


Thursday 15 September 2016

Easel Card using the Floral die tutorial

Ok.  I haven't done many tutorials so please bare with me, any questions please ask.

This card is what they call an Easel card as you can see by the way it stands.


What you will need:

Cardstock -
  1. 11" x 4" (27.94 x 10.16 cm) piece of your choice of coloured card stock
  2. 5 1/2" x 4" (13.97 x 10.16 cm) piece of the same choice of coloured card stock
  3. 3 3/4" x 3 1/2" (9.525 x 8.89 cm) piece of whisper white card stock
  4. 3 1/2" x 3 3/8" (8.89 x 8.57 cm) piece of the same coloured card stock you chose
  5. 3 3/4" x 2 1/4" (9.525 x 5.715 cm) piece of whisper white card stock
These 5 pieces of card stock make up your card minus embellishments so you will need an extra little bit of white card stock for the number 50 and the banner.

For those who don't work with inches here is a guide to help you know the measurements and where they sit on the ruler. I know I had trouble because in Australia we use metric measurements and I was not schooled in Imperial measurements.  


Stamp sets and dies used -
  1. Floral phrases stamp set
  2. Detailed Floral Thinlits Dies
  3. Number of Years Stamp set
  4. Large Numbers Framelit Dies
The Floral Phrases stamp set and die also comes in a bundle which works out cheaper than buying them separately.

or
  1. Big Shot
  2. Embossing folder
  3. Glue
  4. Dimensionals
  5. Sissors
  6. Trimmer
  7. Bone Folder
  8. Ink pad to match your coloured card stock
  9. If you're not using wood mount stamps you will need blocks for your clear mount or photopolymer stamps
  10. Diamante or other embellishment that you find suits
  11. Copper Stampin' embossing powder
  12. Versamark ink
Now that we have that part sorted let's begin.....

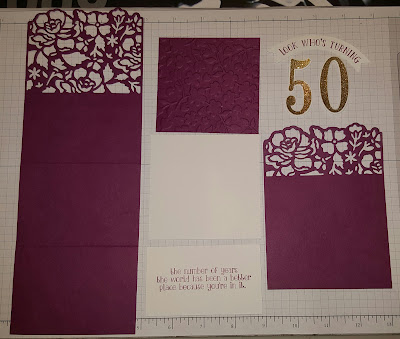
Here are pictures of the sizes of card stock you need, using your trimmer cut your pieces to size.
Score your long piece of coloured card stock at 2 1/2" then 5 1/2"


 Next we need to use the Detailed Floral die to cut the ends to make it look pretty!

Place the long thin die (which is what cuts the edge, if you didn't use this it wouldn't cut the end off) as close to the edge as possible then place the larger die behind it leaving just a small space as you can see in the picture.  The small floral die goes on the 5 1/2" x 4" coloured card stock and the larger floral die goes on the 11" x 4" coloured card stock.  Don't forget to use the long thin die with both of the floral dies.  Place on your plates to run through the Big Shot.
The magnetic platform helps keep them in place or the precision base plate is great to use with detailed dies such as these, this is your choice, I used the magnetic platform.


This is what you will have once you have run it through the Big Shot.


Isn't it pretty??  I think it is :)

Ok let's run the 3 1/2" x 3 3/8" piece of coloured card stock through the Big Shot in the embossing folder you have chosen to use.


 The embossing folder I used is a retired folder but it was what I needed to achieve the result I wanted.  If you are looking for any retired Stampin' Up products to buy there is a great Facebook page that people advertise on: https://www.facebook.com/groups/SUSSF/

Now grab that spare bit of Whisper white card stock, your versamark ink and the number stamps you want to use.  I used 50 as it was for a 50th Birthday.

Stamp the card stock with the versamark then pour the embossing powder over the versamark, shake off the excess powder and put back into the container, then using your heating tool heat the powder until it sets.  I must tell you I found using the embossing buddy before you stamp really does help the excess embossing powder shake off so you're not left with dots of embossing powder where you don't want it.


Then using the number dies cut out your numbers by running through the big shot.

Now stamp your "Look who's turning" stamp on your spare bit of Whisper white card stock. Then cut around it and cut a V in either end. I use a pencil to put a dot on the other side so I know where the middle is to cut to to make the V.


 On your 3 3/4" x 2 1/4" piece of whisper white card stock stamp your sentiment. You will now have all the bits ready to put together.


Layer your 
  1. 5 1/2" x 4" piece coloured card stock
  2. 3 3/4" x 3 1/2" piece of whisper white card stock
  3. 3 1/2" x 3 3/8" piece of coloured card stock
as shown below...


Glue them altogether. (The top layer you will notice isn't embossed because I took the photo before I had embossed it :-/ )

Place your Look who's turning piece onto the top using dimensionals.


Then your numbers using dimensionals...


As you can see I cut the dimensionals down to size.

Glue your sentiment onto the long piece of coloured cardstock and this is what you should have....


Fold the card stock so that is sits like this....
Make sure to use your bone folder along the folds.


Glue your layered piece onto the top as shown....


Then place your embellishment on the bottom floral part so as your card doesn't slide flat as you can see in this photo....


And WALLUH  your card is finished!!

When flat this card will fit in a standard C6 size envelope.

I hope you could understand my instructions. If you have any questions as I said before please ask!

'Til we craft again!

Donna